Dr. Seuss Day!

This week we spent the whole week learning how to read Green Eggs and Ham!  This story is personal to me!  When I was in first grade my teacher was contemplating holding me back because I was struggling with reading.  My mom took me to the library and I checked out Green Eggs and Ham!  Every Week!  My mom was so sick of it!  So...Dr. Seuss taught me to read!  I tell my students this story and they fall in love with the book too!


I made them these super cute treats!  Twist pretzels, white almond bark (melted in the microwave) and Mint m&ms.  They were delicious!

Our cooks serve Green Eggs and Ham every year!  Almost everyone takes hot lunch that day!  It's a big hit!


We made these adorable hats.  I had Things running around everywhere! 
Make a red headband sized to their heads.  6"x18" strips stapled together.  Glue blue strips all around the red headband.  Strips are 1.5"x18".  Glue Thing circle to the front. Curl the blue strips around a marker.

Green Eggs and Ham Interactive Sight Word Activities

I've been making these interactive activities for my class and this is the first one that I've put up for sale.  My class loves these.  The slides are on timers and the set of words go through three speeds: slow, faster, and fastest.

It's a great way to motivate your kiddos to read their sight words quicker!

In the bundle I have Level 1 and Level 2 and an editable version so you can add all your own words.


Level 1 Words Included: am, and, are, be, do, eat, if, in, me, not, on, or, see, so, the, you


Level 2 Words Included: anywhere, could, good, green, here, let, like, may, say, that, them, there, they, try, will, with, would


Added Bonus!

Make your own with the editable version!

Have Fun!


Superhero Reading Celebration Bundle and Freebie

This year my adventure has taken me to kindergarten and I haven't had a whole lot of moments to slow down and blog about this adventure!  Can you say busy!

Our school also adopted Lucy Calkins Reading and Writing Units this year so that has added to the adventure!  We recently celebrated unit 2 - Super Readers!  We all dressed up in our favorite superhero costume!  For those that didn't remember to dress up we gave them a paper headband.  We carried our favorite books and paraded to the office!


 Portrait Time


We read with our 6th grade buddies!


 After Halloween I picked up a Spiderman treat basket for 50 cents!  
What a great item to use for this POW word game!!


https://drive.google.com/file/d/1VhzDPBU1xoHBFuF2ASZnJWCo619-WbzG/view?usp=sharing

Click on the Headbands preview to pick them up for free.
Get the whole bundle for $3.00


DIY Puppet Theater


DIY Puppet Theater!

Are you working on retelling stories!  We are...

What better way than to let the kids use puppets to share their retelling!

This took me about 1.5 hours to complete (on a Saturday of course!)

Start by find a shelf that you can use.  I dug through "extra" furniture room!  I found one that had a short and tall side.  I liked that part of it was shorter so the kids would be able to reach it. I took it outside and painted the back with chalkboard paint!  I anticipate them adding the name of the show or the book they are retelling.


I purchased a trifold display from the Dollar Tree - Love that place!

I used the white side to face the audience.  
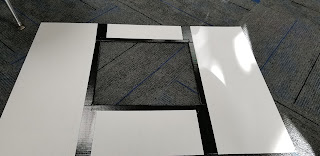
With a ruler I measured out a square and used a blade to cut it out.


Next I used black duct tape that I also purchased from the Dollar Tree.
I bought three roles.

I taped around the square opening so they won't scrape their hands on it. Then extend the tape lines to the top.


Using the width of the tape rolls I spaced out the lines.


All done with this part!


I decided to add fabric for a curtain but you wouldn't need to.
I stapled it across the top but the staples didn't lay completely flat so I add some duct tape over the top!  


You could just set this on a table or on the floor but I'm sure it will get knocked over.
Even with the way I did it I'm not sure it will last too long!  Good thing I only spent $4.


I forgot to take a picture of the other side.  I bent back a portion of the cardboard so I could tape it to the shelf.  I also taped all along the bottom.  The other side is not very sturdy since there is nothing to tape it to.  That's where I have some concern.  Any ideas!?

Happy Puppeteering!


Colored Salt for Letter Practice

I am so excited for the kiddos to start using my colored salt to practice their letter and number formation.

I bought the cheapest salt at Walmart!
  1. Pour the salt into a large ziplock bag.
  2. Use liquid food coloring to get the color you desire.  I made orange and aqua.  I followed the ratios on the back of the box. (I used about four servings of the ratio amount.)
  3. Seal the bag and work the color throughout the salt.  It felt really cool.  I bet the kids would love to mix the salt too.
  4. Let dry!

Place the salt in a tray or I am using a school box.  Try to find a box that doesn't have any openings or the salt can seep out and that's a mess you don't want.

Students lay a card in the lid of the box and draw the letter with their finger.  Encourage them to say the sound of the letter as they are writing it in the sand!


Related Posts Plugin for WordPress, Blogger...